Enhancing Router remote access security with 2FA authentication.
Enhance Router remote access security with 2FA authentication.
This article explains the process for setting up an additional two-factor authentication (2FA) security for logging in remotely to the router's WAN interface. Once implemented, gaining access to the router's management page remotely will require not only the administrator's password but also an Authentication code sent to a specific phone number or email address.
DrayOS 4 Router
N.B: (2FA only supported on WAN interface; not applied to the LAN interface)
1. Setting the choice of message
SMS Message
To send the Authentication Code via SMS, create an SMS service profile at Objects Setting >> SMS / Mail Service Object >> SMS Provider page.

Email Message
To send the Auth Code via email, create a Mail Service profile at Objects Setting >> SMS / Mail Service Object >> Mail Server page.

2. Amend the Administrator's Password Setup
Go to the Administrator's Password page via System Maintenance >> Administrator Password Setup page.
Enable "Use only advanced authentication method for the Administrators' “WAN”' login
Choose 2-Step Authentication
Check SMS, Mail, or both, depending on which method you would like to use to receive the authentication code
Click OK to save

3. When you now access the router's management page from the internet, you will need to click ‘Get Code’ and then enter the code sent to you either by email or SMS, whichever you’ve set up.

DrayOS 5 Router
N.B: (2FA applies to both the WAN and LAN interfaces)
Email Message
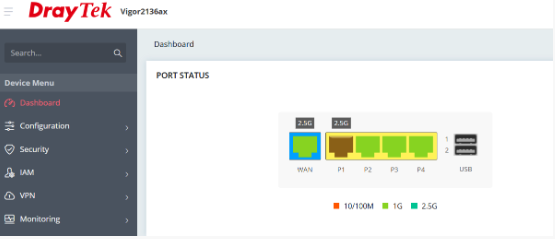
1. Go to ‘Configuration/ Notification Services/SMTP Server Page and edit the ‘Default_Email_Profile’ on the Vigour 2136 in this example
Switch On Enabled to activate the profile
Select the WAN interface through which the email will be sent
Enter the SMTP server’s IP or domain name and the SMTP port
Enter the Sender Address
Select the Connection Security that the SMTP server uses
Enter the email account’s username and password for the SMTP server’s authentication

2. Verify the SMS settings by entering the recipient's email address in the ‘Send Test Email’ field and clicking the ‘Send Test Message’ button. The router will display the ‘Send Status’ and should indicate ‘SUCCESS’ for a successful setup. If the status shows ‘FAILED’, check the setting. An idea would be to compare it to a working email client.
3. Check that the recipient has received the ‘Test Email’

4. Enter default email address information for the Administrator’s account by editing the admin profile: ‘System Maintenance/Account & Permission’. Switch on and enable the email address.

5. Switch on Enable MFA and select ‘Email’ as the allowed MFA method

6. Test it out. Browse to the Vigour Router’s web address and enter the Administrator’s user name and password.

The enabled MFA methods are listed, select email and click ‘Next’

The Vigour router will send a six-digit code to the named Administrator’s email address.
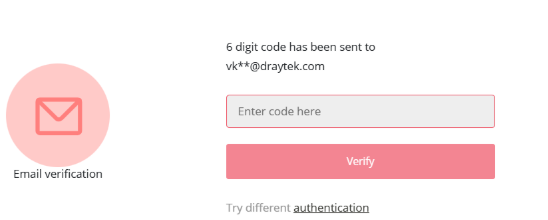
The Administrator should receive a time-critical code in an email.

Paste the code into the box and press ‘Verify’ to gain access.
SMS Message
Navigate to ‘Configuration/ Notifications and Services/ SMS Provider and add a new Profile. The example uses a ‘Customised Service Provider’ option to send the Authentication code via Telegram. Refer to Daytek’s article ‘Register for a telegram bot account’ for instructions on how to create an account and get a bot token.
Give a name for this profile.
Switch on Enabled to enable it.
Select the WAN interface from which the SMS connection will be created
Select Customised for the Service Provider
Enter the SMS Provider API URL
Different supplies may have different API standards, but for Telegram, it's:
https://api.telegram.org/bot[your telegram bot token]/sendMessage?chat_id=&text=


Check the recipient’s Telegram inbox to confirm they have received the text message.

After confirming that the SMS settings are working, change Telegram’s SMS provider API URL back to the standard format:
https://api.telegram.org/bot/sendMessage?chat_id=&text=
Modify the SMS API parameters according to the Service Provider's API requirements. Telegram used ‘text’ to specify the message content and chat_id to specify the recipient number.

Enter the SMS/Telegram Number (chat_id) information for the Administrator's account in System Maintenance > Account and Permission.
Switch on Enable SMS and enter the SMS number.
Switch on Enable MFA and select SMS as the Allowed MFA Method.

Browse to the Vigor Router’s web address and enter the Administrator's credentials.

The enabled MFA methods will be displayed, select SMS and click ‘Next’

The Vigor Router will send a time-critical six-digit code to the Administrator’s Telegram account.

Enter this code and click verify. The Administrator can then sign in to the Vigor router.

Note:
Note that once MFA is enabled for the admin account, the Vigor Router will require MFA for admin logins from both LAN and WAN.
Related Articles
Increasing Wireless Security with WPA3
As wireless speeds approach those of wired connections, businesses are increasingly opting for the convenience of wireless networks and hybrid connections. Consequently, wireless security is more critical than ever. The ability to turn on a device, ...What are GravityZone Bitdefender Security tools
GravityZone provides Windows, Linux, and macOS physical and virtual machine protection with Bitdefender Endpoint Security Tools. On Windows and Linux, the security agent provides a flexible scanning system, making it ideal for mixed environments ...How to fix Failing CyberSmart Active Protect Security Controls
There are four easy-to-follow steps to correct failing security control checks in Active Protect. Open CyberSmart Active Protect on your device For macOS devices, click on the CyberSmart Icon in the menu For Windows, click on the system tray on the ...Can you extend the wireless range of Vigor Routers?
Yes, you can extend and expand the wireless range of Draytek routers. This can be achieved by positioning a VigorAP where it can receive the wireless signal from the router, retransmitting and boosting the signal, thereby extending the wireless ...Creating a high-availability internet connection with Draytek routers
In today's e-commerce-driven business world, having an always-on internet connection is crucial. While a 24x7 presence for the storefront can be reasonably assured through cloud-based hosting, your office staff still need to be able to connect to the ...